- How do I start with handlettering?
- What is hand lettering?
- Handlettering materials you need to get started
- Handlettering tutorial – let’s get started
- Practicing handlettering – tips and tricks for learning lettering
- What is faux calligraphy?
- How does brush lettering work?
- Handlettering layout – how to arrange your lettering
- Handlettering ideas – what can you create?
- Summary: how do you learn handlettering?

A few years ago, I discovered handlettering during my training as a graphic designer and instantly fell in love with it. Back then, handlettering was still quite unknown in Germany, and there were only a few female artists dedicated to the art of beautiful letters. Since then, I’ve immersed myself in the topic and love teaching handlettering to others in my workshops. Discover 110 hand lettering events in Germany and Austria.
How do I start with handlettering?
If someone had told me back then how to start with handlettering in the best way, I would have saved a lot of time and effort. I want to help you get to beautiful results faster. You do not need much, but you do need a few key things.
Here, you’ll learn what you need to begin and which styles matter most, so you can jump right in and start practicing.
Painting instead of writing.
What is hand lettering?
Handlettering can be translated loosely as “beautiful writing” or “drawing letters.” No matter which materials you use, handlettering gives you a lot of freedom. It borrows techniques from both calligraphy and typography, but it remains its own creative craft.
You are probably asking yourself these questions:
What is the difference between hand lettering and calligraphy?
Here is a simple explanation: calligraphy is often seen as the supreme discipline because it focuses heavily on precision. The goal is to create a very accurate and consistent script. This craft usually uses tools such as nibs and ink.
What is the difference between hand lettering and typography?
Typography is something you encounter every day, often without noticing it. These are digital typefaces created on a computer and used across media such as television, flyers, magazines, street advertising, shop windows, and much more. Typography follows fixed rules to place fonts into a layout.
In handlettering, we work with tools such as pencils, felt-tip pens, fineliners, Brush Pens, and brushes. These tools also allow you to create brush lettering styles. Because of the variety of materials, you can work on many different surfaces. I’ll share some examples later on. As you can see, handlettering is a very free craft that you can use in many creative ways.
Handlettering materials you need to get started
The beginning can feel overwhelming. But don’t worry. I’ll guide you step by step. Let’s start with the materials you need at the beginning.
Paper for handlettering
If you work with pencils, felt-tip pens, fineliners, or similar tools, you can use almost any paper because the tips are sturdy. Brush lettering is different. For that, you really need smooth coated paper. Regular copy paper is too rough for flexible brush pen tips and feels almost like sandpaper.
That means your pens wear out much faster. I did not take the right paper seriously at the beginning, and I quickly learned how important it is for keeping your pens in good shape.
“Copy paper is like sandpaper for brush pens.”
The best hand lettering pens
You can actually use almost any pen for handlettering. If you want, you could even write with your finger in the snow or create lettering from baking ingredients. Anything is possible. Still, most common pens create a consistent line width.
If you want more variation in line thickness, you can use faux calligraphy or brush lettering. I’ll explain faux calligraphy in a moment, but first let’s look at brush lettering. For this, you use a Brush Pen. You can think of it as a mix between a brush and a pen. The big advantage is that it creates different line widths depending on how much pressure you apply, while still giving a steady flow of color. That makes brush pens perfect for handlettering for beginners and beyond.
Brush pens for beginners
There are so many different brush pens on the market. Since I’ve tried a lot of them over the years, I can tell you what matters most at the start:
- The tip should be flexible, but not too soft.
- A slightly firmer tip gives you a better feel for the resistance on the paper.
- I recommend the Tombow Fudenosuke in hard and soft, as well as the Pen 68 Brush by Stabilo.
Tip: Learning handlettering is also a lot of fun in a group and works perfectly as a creative event for a team event, bachelor party, or birthday celebration. Book your private event now through konfetti.
Handlettering tutorial – let’s get started
Now that you know which materials you need, let’s begin. One thing people often underestimate is the right workspace. It’s best to sit at a desk or dining table with good lighting. That helps your posture and improves your lettering.
In my Hand lettering workshops, I always introduce the most important styles and alphabets first. That helps beginners avoid feeling overwhelmed, because there are so many fonts and styles online. First, we need a structure that your letters can stand on. This is called a guideline grid. Every handlettering piece uses one, even if it doesn’t appear in the final artwork.

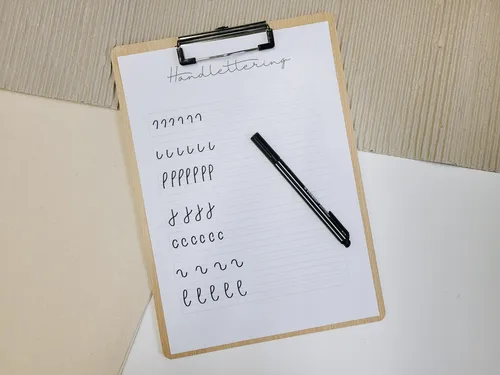
Simple handlettering styles
In the image, you can see simple handlettering styles. Some of them will probably remind you of learning to write in primary school. I often use these simple styles for secondary words such as “how,” “I,” “you,” or “is,” and also for longer texts.

Flowing handlettering styles
These handlettering styles look especially beautiful because they build on each other. That makes it easier to practice the next ones. If you begin in the right order and move step by step, you can achieve beautiful results quite quickly.
It is important to know that the following styles and alphabets require practice and patience. It took me quite some time to master the craft, and I still keep learning today. Practice matters in lettering just as much as anywhere else.
Handlettering: Monoline – one single line
This style basically means writing in one line weight and in one flow. Still, I often lift the pen while writing. I always say we are just taking a short rest in between, because there are several things to pay attention to while writing.
Here, I’ve drawn the basic shapes that we later use to build letters. Since some letters use the same shapes, it makes sense to practice these forms first. That helps you create a more even overall result later.

From these monoline basic shapes, you can form many handlettering letters.

In the examples, you can clearly see how single shapes become letters and how these letters then form a word. Try it yourself with this short tutorial:
- Choose two colors for your lettering.
- Switch pens every time you lift your pen.
- Then take one color and create the typical monoline look.

Practicing handlettering – tips and tricks for learning lettering
Practice the monoline basic shapes, one line of one shape every day for two weeks, and you’ll notice your writing improve. Here are a few more tips to keep in mind:
- Make sure the space between the letters is about as wide as the letters themselves.
- Extend the connecting line to the next letter up to the dotted guideline.
- Your lettering should look airy and relaxed, not cramped.

The monoline style forms the foundation for the next two lettering styles. That’s why I recommend practicing it for a few weeks first.
What is faux calligraphy?
As mentioned at the start, I’ll now show you “false calligraphy,” also known as faux calligraphy. This handlettering style gets its name because it looks like calligraphy, but it is written with a pen that has a consistent line width rather than a nib and ink.
How faux calligraphy works
Just like in calligraphy, we use different line widths:
- All strokes that move from top to bottom are made thick.
- All strokes that move from bottom to top stay thin.
- Horizontal strokes also stay thin in faux calligraphy.

- In faux calligraphy, the monoline style comes into play again. The difference is that you draw a second parallel line next to every downward stroke.

- Once you fill in the empty spaces, you create the faux calligraphy effect.

In general, this technique is much easier at the beginning than brush lettering. Once you feel confident with brush pens, you can move on to brush lettering.
Tip: Looking for a Hand lettering class as a gift? With the konfetti gift card, you can give someone access to more than 25 handlettering workshops.
How does brush lettering work?
- Hold your pen correctly: Your grip matters in brush lettering if you want a clean result. Sit upright at your desk and hold the Brush Pen as shown in the example.

- Choose the right Brush Pen and paper: Then make a few small drops in the top corner of your sheet. As mentioned earlier, make sure you use smooth handlettering paper. With a small brush tip, the drop may be about three to four millimeters long. With a larger brush tip, it may be around five to seven millimeters. That depends on the pen and the pressure you apply.
- Make the first stroke: Now pull the Brush Pen downward with pressure to create a thick line. When you move upward, reduce the pressure. This is the core principle you can see in the worksheet.

- Practice brush lettering: Now take the monoline and faux calligraphy forms and practice them with your Brush Pen. This takes a lot of patience, because writing with pressure feels unfamiliar at first. Give yourself time. Be patient. It’s like learning to ride a bike. That does not happen in a day either.
- Practice the basic forms: Start with the basic brush lettering shapes until you feel more confident.

- Build letters: Next, connect those basic forms into letters.

- Form words: Then combine those letters into full words.

Handlettering layout – how to arrange your lettering
Now that you know the different lettering styles, you only need to place them into a fitting layout. Here’s a simple process:
- Choose a quote: Start with a phrase that has two to three words. Fewer words make the beginning easier.
- Sketch the phrase: Write it in pencil on sketch paper in uppercase letters at the top of the page.
- Draw boxes as a grid: Put a box around each word. At first, focus on the words rather than the individual letters.
- Arrange the words: Move the words around until the composition feels right.
- Choose your lettering styles: Decide which style fits each word. Use no more than one or two styles. Less is more.
- Create your template: Sketch the words into the boxes. It can still look simple here. You just want a first idea of the layout.
- Refine the sketch: Pick your favorite version and develop it further.

The great thing about sketch paper is that you can adjust your template as often as you want. If you work directly on your final paper, be careful not to press too hard with the pencil. Otherwise, the lines may still show even after erasing. Another advantage is that you can reuse your handlettering template again and again.

Once your sketch is finished, you can transfer it using a simple copying technique. Turn your sketch over and place scrap paper underneath it. Shade the back of your template with a pencil. Then place the sketch, shaded side down, onto your final paper and trace over the lettering with a pencil. The graphite transfers onto the final paper and creates a copy.

Finish your lettering: Now you can work out your lettering with your favorite colors and pens.

Handlettering ideas – what can you create?
Handlettering cards: Many participants in my workshops first think of birthday cards, wedding cards, or Christmas cards. And they are absolutely right. You can create beautiful Christmas and birthday cards with handlettering.

More handlettering ideas: You can apply your lettering to almost anything you can think of:
- window lettering or quotes on your mirror
- labels for your storage jars
- lettering on a jute bag
- lettering on wooden boards and much more
To make these ideas happen, you’ll need either an acrylic marker or a liquid chalk marker, depending on whether you want the design to be permanent or temporary.

Digital handlettering: I also take it one step further and digitize my lettering. With the help of a cutting machine and special foil, I create beautiful iron-on handlettering designs and handmade lettering stickers that I apply to bags or mirrors, for example.

Summary: how do you learn handlettering?
You’ve now learned what handlettering is, which materials you need to start, and which first styles are worth practicing. You may even have discovered one or two creative ideas for your own projects. If you have questions or want even more tips and tricks, feel free to join one of my Hand lettering workshops.